Cursor

Blue Fire Pointer
Diberdayakan oleh Blogger.

idm full version 2013

Cara ini bisa digunakan untuk IDM versi berapa saja (^_^)

Silahkan download IDM versi terbaru di WEBSITE nya.

Install... kalo ada peringatan fake serial atau disuruh register abaikan dulu / klik cancel.

Lalu perhatikan cara berikut :

1. Hal pertama yg harus kita lakukan adalah mematikan / memutuskan koneksi internet komputer kita.

2. Setelah itu isi registration.
First name, last name, dan email terserah kita. Untuk serial number gunakan (pilih salah satu) :
1B0C2-NOGKB-AH0DH-W8R3C
S89JW-J3KDR-KBHW5-RMQ8H
QVD3H-ZY9K1-GW94Z-XOLQS
1XL56-8BB1L-TTQII-89DFX
X33SI-6BW37-SQG4D-FGN8M
1O6SO-LOOFL-ZFW66-EIF97
UXX3S-9N0NT-M74X0-DESMI
W3J5U-8U66N-D0B9M-54SLM
EC0Q6-QN7UH-5S3JB-YZMEK
GZLJY-X50S3-0S20D-NFRF9


Lalu klik OK


3. Buka windows explorer, cari file bernama hosts di C:\WINDOWS\system32\drivers\etc\hosts


Buka file hosts tersebut dengan notepad.


4. Lalu copas code berikut : 
127.0.0.1 tonec.com 
127.0.0.1 www.tonec.com 
127.0.0.1 registeridm.com 
127.0.0.1 www.registeridm.com 
127.0.0.1 secure.registeridm.com 
127.0.0.1 internetdownloadmanager.com 
127.0.0.1 www.internetdownloadmanager.com 
127.0.0.1 secure.internetdownloadmanager.com 
127.0.0.1 www.secure.internetdownloadmanager.com 
127.0.0.1 mirror.internetdownloadmanager.com 
127.0.0.1 www.mirror.internetdownloadmanager.com 
127.0.0.1 mirror2.internetdownloadmanager.com 
127.0.0.1 www.mirror2.internetdownloadmanager.com 
127.0.0.1 mirror3.internetdownloadmanager.com 
127.0.0.1 www.mirror3.internetdownloadmanager.com
127.0.0.1 174.133.70.98

Letakkan dibawah tulisan 127.0.0.1 localhost


Setelah itu save (Ctrl S).


5. Nyalakan kembali koneksi internet.

Beress... IDM kita sudah full version... tanpa harus menggunakan crack (^_^)


Dipake buat download nggak ada masalah... normal seperti biasa... (^_^)


Selamat mencoba... dan ucapkan selamat tinggal kepada crack... hahahaa... (^_^)


Tambahan :

1. Kalo file hosts nggak ketemu, ada kemungkinan terhidden. Aktifkan view hidden files di windows explorer.

2. Untuk pengguna windows vista / windows 7, ada beberapa cara edit file hosts nya :
- Copy file hosts ke drive lain selain drive C, edit dengan notepad kemudian save, copy paste file tersebut ke tempat asal folder file hosts
- Edit nya via administrator
- Edit nya via safe mode

3. Karena kita telah mem-block main download server IDM (mirror2.internetdownloadmanager.com), maka untuk mendownload versi terbaru dari IDM, pilih download from Cnet, atau dari Mirror Site yg ada di Page Download.

Sumber

Download Tuneup Utilities 2014 Full Serial Key + Crack Full Version

Download Tuneup Utilities 2014 Full Serial Key + Crack Full Version, Download Tuneup Utilities 2014 Full Serial Number Keygen, Download Tuneup Utilities 2014 Full Version, Tuneup Utilities 2014 Serial, Tuneup Utilities Serial Number, Tuneup Utilities Serial Key, Tuneup Utilities Full Version, Tuneup Utilities Crack, Tuneup Utilities Patch, Download Tuneup Utilities 2014 Terbaru Full Version, Download Tuneup Utilities 2014 Terbaru Full Serial, Download Tuneup Utilities 2014 Terbaru Full Serial Number, Download Tuneup Utilities 2014 Terbaru Full Patch, Download Tuneup Utilities 2014 Terbaru Full Crack, Download Tuneup Utilities 2014 Terbaru Full Serial Key.


Tuneup Utilities 2014 Pro
Download TuneUp Utilities 2014 14.0.1000.145 Full Serial Key - Seperti yang kita ketahui, TuneUp Utilities adalah software utility tools yang dapat kita gunakan untuk memaksimalkan kinerja sistem operasi yang bekerja pada komputer kita. Software ini memiliki banyak fungsi terutama untuk pembersihan dan perawatan sistem komputer kita, dan juga bisa kita gunakan untuk mempercantik tampilan windows kita.

Dalam versi terbaru ini tampilan Tuneup Utilities 2014 semakin user friendly dan terdapat beberapa fitur baru seperti New Duplicate Finder, Improved Disk Cleaner, New Flight Mode sebuah fitur yang dapat menghemat battery laptop sampai 49% dan masih banyak lagi fitur yang terdapat di versi terbaru ini. Dan juga Tuneup Utilities 2014 sudah support Windows 8.

Download Setup :

Serial Key Number Tuneup Utilities 2014 :
  • TMACO-HRNAV-OZGB2-ADQKE-WC2K2-XCY2J

Setelah aktivasi jalankan host yang bisa sobat download di bawah ini agar tidak diblacklist (anti blacklist) :
- See more at: http://chairullight-2nd.blogspot.com/2013/11/download-tuneup-utilities-2014-full.html#sthash.5pe1Ftvf.dpuf

Update Offline (Windows Update) Windows 8.1 x86/x64!!


Win 8.1 UpdateSetelah sebelumnya windows 7 sekarang admin akan share update offline khusus untuk windows 8.1. Update offline ini komplit sehingga sobat tidak akan pusing dengan kuota windows update yang besar karena setiap instal ulang sobat tinggal cukup jalankan update offlinenyda dan windows sobat akan terupdate ke update terakhir yang di rilis. penasaran sob?

Apa itu Update Offline (Windows Update) Windows 8.1 x86/x64?
Update Offline (Windows Update) Windows 8.1 x86/x64 adalah update offline yang dapat digunakan untuk menginstal windows update tanpa koneksi internet sehingga menghemat waktu dan biaya
Win 8 Update
Fitur-fitur Update Offline (Windows Update) Windows 8.1 x86/x64:
1. Support sistem 32 bit dan 64 bit
2. Termasuk directX
3. Termasuk .Net framework 3.5, 4.0
4. Termasuk update terakhir windows
5. dan fitur lainnya sob
Slahkan di download Update Offline (Windows Update) Windows 8.1 x86/x64 supaya mempermudah sobat dalam mengupdate windows dan dapat digunakan berulang kali tanpa harus terkoneksi internet. Software, games yang free hanya di ad4msan.com
ad4msan.com
(Last Update 25 Desember 2014)
Update Offline Windows 8.1 x86/x64 | Size: 6,8 GB
download
MD5 Hash: 650D6DF04E1A68082D666F6EC3810CBF

Advanced SystemCare 7.43.0.474 Pro Full Crack

Advanced SystemCare 7 Full adalah salah satu software terbaik yang dapat kita gunakan untuk mengoptimalkan kinerja komputer kita sekaligus memberikan perlindungan yang baik dari serangan spyware karena fitur anti-spyware yang terdapat di dalam software Advanced SystemCare 7 ini. Software yang satu ini merupakan software all in one yang paling banyak digunakan oleh orang-orang di seluruh dunia. Karena cukup dengan menggunakan Advanced SystemCare 7 Full ini, maka anda akan mendapatkan semuanya. Anda dapat mengoptimalkan koneksi internet anda dengan mudah, membersihkan komputer anda dari berbagai macam file sampah yang tidak berguna, mengoptimalkan harddisk anda, dan banyak lagi lainnya.

Advanced SystemCare 7 Pro

Disini kami membagikan Advanced SystemCare 7 Pro versi terbaru yang memiliki beragai macam fitur baru yang lebih canggih dan akan memberikan perlindungan yang lebih maksimal ke komputer anda serta menjaga stabilitas kinerja windows yang terinstal di komputer atau laptop anda. Disini kami membagikan crack Advanced SystemCare 7 Pro yang apat anda gunakan untuk membuat software ini menjadi software full version dengan gratis. Pastinya anda juga dapat download Advanced SystemCare 7 Pro ini dengan gratis tanpa harus membayar apapun.
Fitur Advanced SystemCare 7 Pro :
• Designed for the latest Windows system environment. Gives your PC better speed and reliability
• Powerful Hard Drive Defrag and Optimization
• Next-generation Registry Deep Clean and Optimization
• Automated Working in the Background
• Defends PC Security with Extra Protection
• Quick and Extensive Clean-up for Hard Drives
• Keeps Your PC Running at Peak Performance
• Fixes Multiple System Errors
OS : Windows XP, Vista, 7 and 8
Language : Multilingual
Serial : A5159-75866-173EE-756F7
How To Use Crack Advanced SystemCare 7 Pro
  • Delete “Auto Update.exe” from “C:\Program Files\IObit\Advanced SystemCare 7″
  • Then Go to c:\Windows\System32\drivers\etc\hosts
  • Add to c:\Windows\System32\drivers\etc\hosts
    127.0.0.1 www.iobit.com
    127.0.0.1 www.asc55.iobit.com
Link Download
FireDrive
MirrorCreator

TuneUp Utilities 2014 14.0.1000.275 Full Version


Download TuneUp Utilities 2014 14.0.1000.275 Full Version 
ingin share software Utilities yang berguna untuk menjaga PC atau Laptop kita. Software tersebut bernama TuneUp Utilities 2014. Sebuah software yang sangat populer untuk menjaga PC / Laptop seseorang dalam kondisi yang baik serta berguna untuk memelihara dan memperbaiki system registry di PC / Laptop sobat. Bagi sobat sobat yang ingin memiliki TuneUp Utilities 2014 ini, silahkan saja klik link download yang sudah saya sertakan dibawah ini.

TuneUp Utilities 2014 Full Version

TuneUp Utilities 2014 14.0.1000.275 Full Version

TuneUp Utilities 2014 dapat mengoptimalkan kinerja komputer Anda, mengoreksi masalah dan membantu Anda untuk menyesuaikan sistem anda sesuai dengan kebutuhan anda. Hal ini menggabungkan aspek-aspek penting dari konfigurasi sistem, keamanan, pembersihan dan pemeliharaan di bawah antarmuka yang modern. Anda dapat menghapus file yang tidak perlu dari hard disk Anda (s), serta membersihkan dan mengoptimalkan registri, tweak setting koneksi internet Anda, memulihkan file yang telah dihapus, mengoptimalkan memori dan melihat informasi hardware.

TuneUp Utilities juga mencakup registry Program Deactivator, Uninstaller, Editor, Task Manager dan bahkan alat Undelete untuk memulihkan file yang telah dihapus dari recycle bin. Sebuah alat yang sangat bagus, dengan banyak fitur yang akan menarik bagi pemula maupun pengguna tingkat lanjut, TuneUp Utilities membuat Windows lebih cepat, lebih aman, dan nyaman.

TuneUp Utilities 2014 Full Version

TuneUp Utilities 2014 terus memantau PC Anda dan secara otomatis memberi Anda memperbaiki kinerja. Versi terbaru kami menawarkan kecepatan lebih, baterai lebih lama dan lebih banyak ruang disk. Rekomendasi langsung dan berbagai alat membiarkan Anda fine tune untuk performa yang lebih.

What's new in this version:

  • New definitions for cleaning Windows 8 and Windows 8.1 Metro applications.
  • New definitions for cleaning Malwarebytes Anti-Malware 1.75, Adobe Photoshop CS6, Adobe Lightroom, Nero 12, Avast Pro Antivirus.
  • Updated definitions for Shortcut Cleaner.
  • Duplicate Finder: Enhanced Browse dialog.
  • Duplicate Finder: Added Stop button and possibility to show current results.
  • Duplicate Finder: Implemented duplicate folders.
  • Duplicate Finder: Resizable picture previews.
  • Duplicate Finder: Excluded files option into settings.
  • Duplicate Finder: Fixed issue with ignore hidden files.
  • User interface: Maintenance tile shows yellow status when first scan after installation is skipped or maintenance has not been performed in the last 14 days.
  • Program Deactivator: Fixed issue with disabled Acrobat reader.
  • Installation: Fixed issue with slow transition between 1st and 2nd installation screen.
  • Fixed crashes of Main UI, Performance Optimizer, Startup Manager.
Requirements:
  • Min. 300 MHz processor
  • 256 MB RAM
  • Resolusi layar minimal 1024x600 pixel
  • Untuk versi online: minimal 80 MB ruang disk bebas
  • Untuk versi CD: sedikitnya 300 MB ruang disk bebas (dan CD-ROM atau DVD drive)
  • Internet Explorer 6 atau lebih tinggi.
Download TuneUp Utilities 2014 14.0.1000.275 Full Version
Link =>> [ Tusfiles ]
Mirror =>> [ 4upfiles ]

Download Keygen TuneUp Utilities 2014 (only keygen)
Link =>> [ Tusfiles ] | [ 4upfiles ]

Focus Photoeditor 6.5 Download


Focus Photoeditor 6.5 Download

About Focus Photoeditor vi.5:
Focus Photoeditor vi.5 may be a powerful, easy-to-use image editor, that may be wont to improve and proper all quite digital photos and to provide graphics for the net, the house and therefore the workplace. you'll acquire digital footage from file, from alternative applications, or with the assistance of a scanner or a camera and begin to figure with them straight off. strive the various automatic improvement functions and proper your photos in a very matter of seconds. With its several image regulation skills, that improve the photographs look, while not loosing any quality, Focus may be used as a powerful and skilled tool by each beginner and advanced photographers.

Main options Of Focus Photoeditor vi.5:

• masses quick, holding you straight off begin to edit your footage
• doesn't eat up memory: memory consumption doesn't grow with the quantity of layers or the quantity of files opened
• Supports over a hundred camera RAW formats
• Has the simplest set of Automatic exposure Corrections you'll kindle
• Uses prime quality exposure correction algorithms, that also are finely tuned
• contains a terribly straightforward to use Batch Processor with undo capabilities
• Supports powerful ways that of making choices and has separate undo history for them
• options nice management over precise piece of writing
• Provides several choices to avoid wasting and export files (optimized size and preview for all formats)
• contains a terribly comfy image browser: permits you to rotate, build backup copies, copy & paste, print image files in a very sheet
• Offers several extras, sort of a web-album builder
• Improved interface
• added  support for newest cameras
• Improved speed of many piece of writing and displaying operations
• added  some exposure corrections and improved existing ones
• added  "Auto Crop"
• Paint Engine was improved, currently follows the mouse movements a lot of swimmingly and exactly
• Improved "Quick Fix" correction
• added  Automatic and Manual "Dynamic Range" Correction
• Corrected several bugs
• Improved several alternative options

Size : thirty seven MB

Download Focus Photoeditor


DOWNLOAD NOW (MIRROR LINK)


Focus Photoeditor 6.5 Download

download CorelDRAW X3 Highly Compressed 48 MB


download CorelDRAW X3 Highly Compressed 48 MB


CorelDraw Graphics Suite could be a computer code package of style tools designed to run on Windows in operation systems. the most application during this massive package of tools is CorelDraw, that is employed for vector styles and layouts. Corel Photo-Paint is meant to retouch and edit digital photos, and different apps within the package will do tasks like screen grabs, collaborate with co-workers, and more.
The CorelDraw interface has the acquainted Windows choices with pull-down menus for File, Edit, and View. Main functions like effects ar simply applied with massive buttons on the left of the most window. New effects for this unleash embrace Smear, Twirl, Attract, and Repel. we tend to liked  that you’ll instantly see a preview of what the result can do to your drawing which you'll use drag and drop to pick a particular space for effects. If you don’t just like the look of the result, it may be shifted even as quickly. additionally useful were the numerous professionally designed templates to simply produce things like posters, business cards, and newsletters.

DOWNLOAD NOW (MIRROR LINK)


download CorelDRAW X3 Highly Compressed 48 MB

CorelDRAW Graphics Suite X5 SP3 With Keygen Free Download


CorelDRAW Graphics Suite X5 SP3 With Keygen Free Download

CorelDRAW Graphics Suite X5 SP3 With Keygen Free Download
CorelDRAW Graphics Suite X5 SP3 With Keygen Free Download expanded speed, more exact shade control, improved vector delineation devices and new Web abilities, it’s an unquestionable requirement have for any architect. Get running rapidly with new professionally composed layouts and learning materials. Discover representation, textual styles and pictures on your machine speedier than any other time with new Corel® Connect™. Re-reason and impart your manifestations anyplace to stretched document similarity. At that point yield all over, from Web standards and movements, to logos and custom. 

CorelDRAW Graphics Suite X5 SP3 With Keygen Free Download Discover all that you requirement for expert design delineation, format, following, photograph altering, Web illustrations and activity in one complete suite of incorporated applications that is not difficult to learn.

DOWNLOAD NOW (MIRROR LINK)


CorelDRAW Graphics Suite X5 SP3 With Keygen Free Download

Cara Membuat Bootable Flashdisk Tanpa Software (Win7/8/8.1)


Cara Membuat Bootable Flashdisk Tanpa Software (Win7/8/8.1)

TUTORIAL LENGKAP
MEMBUAT BOOTABLE FLASHDISK TANPA SOFTWARE + PIC
UNTUK WINDOWS 7 / 8 / 8.1
Bootable via Flashdisk termasuk bootable yang menurut saya cukup aman dan disarankan untuk menginstallasi Windows. kenapa demikian? menurut saya, Bootable via flashdisk itu mengurangi adanya file corrupt dari Installer windows itu sendiri seperti yang saya pernah alami. Saya pernah menginstall Windows menggunakan DVD. Pada saat itu DVD yang saya gunakan kondisinya sudah kurang baik, sudah banyak goresan-goresan kecil di DVD Installer tersebut. tetapi saya pun tetap memaksa untuk menginstallnya tapi akhirnya Bluescreen
Ada 2 Hal yang saya perhatikan jika saya mau menginstall menggunakan DVD Installer yaitu Melihat kondisi DVD Drive apakah masih baik dan masih lancar dalam membaca suatu piringan DVD atau CD? Dan yang kedua yaitu DVD Installernya apakah masih dalam kondisi yang baik?
Dari apa yang saya sudah tulis diatas, kenapa kita memilih bootable via flashdisk ? karena lebih mudah, dan mengurangi adanya file penting yang ada pada windows yang corrupt. tetapi dengan cara ini, anda harus milihat kondisi flashdisknya terlebih dahulu juga yah.
Kita langsung ke pokok pembahasan. 
Cara membuat bootable flashdisk tanpa software.
Cara ini adalah cara yang cukup mudah bagi saya. karena kita tidak perlu mendownload software dan kita hanya membutuhkan command prompt yang telah disediakan oleh windows.
Apa saja yang disediakan jika kita ingin membuat bootable windows di flashdisk?

  1. Installer Windows 7/8/8.1 yang telah anda download terlebih dahulu. (anda juga bisa mengambil installer dari DVD)
  2. Flashdisk yang kinerjanya masih Normal dan masih baik.
  3. Ketelitian
Langkah-langkah membuat bootable windows tanpa software.
Disini saya akan memberikan tutorial + screenshot. dan pada contoh ini, saya akan membuat bootable windows 8.1.

1. Masukan atau colokan Flashdisk yang akan dijadikan bootable windows. saya sarankan flashdisk kosong terlebih dahulu.
2. Bukalah CMD dengan cara CTRL+R dan ketikan cmd lalu tekan Enter.
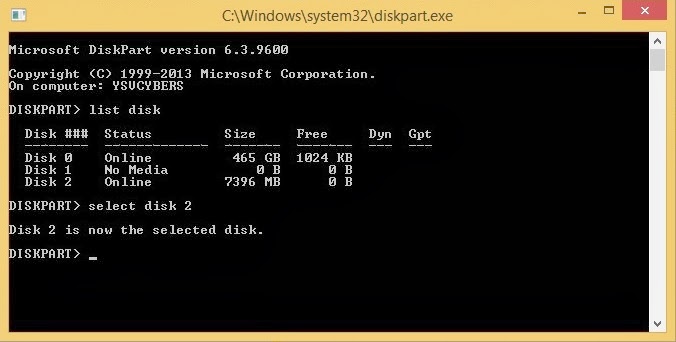
3. Setelah anda membuka CMD, ketikan DISKPART Lalu tekan enter dan akan muncul kotak dialog DISKPART seperti ini.
4. ketikan LIST DISK lalu tekan enter
dalam LIST DISK anda akan melihat beberapa disk. disk itu menentukan harddisk dan media yang anda gunakan seperti flashdisk. dalam contoh diatas, flashdisk yang saya gunakan yaitu Disk 2.jika sudah memahami letak dimana flashdisk itu berada, lanjut ke langkah berikutnya.
5. Ketikan SELECT DISK 2 (kenapa Disk 2? karena dalam contoh yang saya gunakan, flashdisk saya terdapat dalam disk 2). jika flashdisk anda di disk 2, 3, dst, silahkan ganti pada SELECT DISK 2 menjadi SELECT DISK 3, 4 dst. lihat lah gambar dibawah ini.
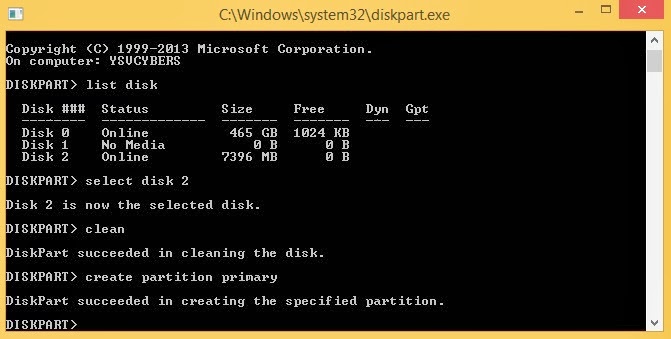
6. Setelah itu, Ketikan CLEAN > enter


7. Ketikan CREATE PARTITION PRIMARY > enter

8. ketikan SELECT PARTITION 1 > enter
9. Ketikan ACTIVE > enter
10. Ketikan FORMAT FS=NTFS > enter
Tunggu hingga proses format selesai 100%
11. Ketikan ASSIGN > enter dan muncul tampilan seperti ini.
12. setelah tahap diatas selesai, ketikan EXIT untuk keluar dari diskpart.
13. Siapkan lah Installer Windows 7/8/8.1 yang akan kalian buat bootable nya. anda bisa mount installer berformat ISO yang telah anda download menggunakan software power ISO, Daemon, dan sebagainya atau anda bisa dari DVD installer yang sudah anda siapkan lalu copykan semua file dan folder yang terdapat pada file ISO atau DVD Installer tersebut (INGAT!! Jangan sampai ada yang tidak dicopy).
14. Setelah semua tahap selesai, Silahkan kalian Eject Flashdisk yang kalian gunakan sebagai sebagai bootable windows 7/8/8.1 Lalu colokan kembali. lihat, apakah icon Drive pada Flashdisk yang kalian gunakan sudah berubah menjadi Icon installer windows seperti ini?
Jika icon drive flashdisk sudah berubah, berarti anda berhasil membuat bootable via flashdisk. Untuk menginstall Windows via flashdisk, kalian hanya mengubah primary boot device pada BIOS Anda.
Terimakasih, semoga artikel ini membantu dan bermanfaat bagi anda semua.

DOWNLOAD NOW (MIRROR LINK)


Cara Membuat Bootable Flashdisk Tanpa Software (Win7/8/8.1)

USB Virus Scan 2.44 Full Version Download


USB Virus Scan 2.44 Full Version Download

USB Virus Scan a pair of.44 provides absolutely USB security solutions , it not solely permits you to realize full management of each usb port, however additionally provides 100 percent protection against any malicious programs attempting to attack via USB storage. All knowledge in your laptop and usb drives can get absolutely protection provided by USB Virus Scan a pair of.44.

USB Virus Scan a pair of.44 Key Features:
Get management over the employment of all USB storage devices
You can set the USB drive standing to scan solely or decipherable Writable each on the machine, additionally you'll be able to disable usage of any usb storage devices to stop knowledge leaks across USB flash drives. additional data

100 protection against any virus via USB drives
USB Virus Scan uses innovative technology to dam any threats via USB drive,any USB drives inserted into laptop, USB Virus Scan a pair of.44 can mechanically scan it and take away threats. There area unit comparatively few merchandise obtainable in outlets or on the net which may supply even near 100 percent protection against any malicious programs via USB drive. the bulk of merchandise area unit unable even to ensure sixty protection.

Clean USB virus in your infected system
USB Virus Scan a pair of.44 can't solely block virus spreading thought external removable media, however additionally has the flexibility to find and take away usb virus in your laptop. What you would like to try and do is clicking the scan button,and looking ahead to virus scan to finish.

The best resolution to safeguard offline laptop
Other antivirus software system ought to update signature info frequently, and that they can't effectively shield offline laptop that's not connected to the net. once new viruses, worms and different malicious attacks strike, ancient signatures area unit short.USB Virus Scan a pair of.44 uses advanced detection techniques, it doesn’t primarily consider virus signature, therefore it will shield offline laptop from usb virus effectively while not change often.

Support all types of external removable media
Pen Drives
USB Cameras
USB Flash cards
USB MP3 players
USB Audio players
External onerous drives
Pocket PCs
Mobile phones
iPod’s and iPhone’s
Other USB mass storage enabled devices

How To Install USB Virus Scan a pair of.44:
(1): Please use 7Zip/WinRAR/Universal Extractor to EXTRACT FILES
(2): run the setup
(3): Use the given key to activate
(4): get pleasure from and Support Developers, Buy It, They merited It!

DOWNLOAD NOW (MIRROR LINK)


USB Virus Scan 2.44 Full Version Download

Any Video Converter Ultimate V 5.5.7 Free Download With Serial Key


Any Video Converter Ultimate V 5.5.7 Free Download With Serial Key

Any Video Converter Ultimate V 5.5.7 Free Download With Serial Key
Any Video convertor V5.5.7  is AN tired One video changing tool that is employed to transfer and convert video files in each formats.Any Video convertor V5.5.7 with serial key has full advanced options that supports outlined video file formats because the desired format.Any Video convertor makes it simple for anyone to fancy the any format video.

It is simple to use.
You can Converts all video formats to Apple iPod devices
You can  convert any video formats
It will Support DivX and Xvid avi format 
It Has advanced options to  preview the video in real time.

DOWNLOAD NOW (MIRROR LINK)


Any Video Converter Ultimate V 5.5.7 Free Download With Serial Key

Cyberghost 5 Free Download With Lifetime Activator+Keygen


Cyberghost 5 Free Download With Lifetime Activator+Keygen

Cyberghost 5 Free Download With Lifetime Activator+Keygen gives you a chance to surf namelessly by concealing your IP address and supplanting it with that of the server you decide to associate with, making it incomprehensible.

Each time you join through Cyberghost VPN a defensive passage is structured around your data and all your information gets to be scrambled. You don?t need to stress any longer over passwords, monetary transactions or private discussions. 

By utilizing Cyberghost VPN you can sidestep channels and firewalls and access area confined or blocked sites from school, college or work. In the event that you need to be secure and unacknowledged while utilizing projects like Bittorrent to download or transfer substance, verify your web association is scrambled and your IP covered up with Cyberghost VPN. 

Cyberghost VPN permits you to unblock destinations . It additionally keeps you unknown and secures your information when associated with open Wi-fi. 
How To Install:
1. Click On 
2. Enter Serial and Click Enact. 
3. Presently Click On 
The Programe Will Close And Revive Auto. 
4. Step 1 and 2 Again With The Same Serial You Utilized, and you're Carried out.

DOWNLOAD NOW (MIRROR LINK)


Cyberghost 5 Free Download With Lifetime Activator+Keygen

Smith Micro Manga Studio EX 5.0.5 With Keygen/key Free Download


Smith Micro Manga Studio EX 5.0.5 With Keygen/key Free Download

Smith Micro Manga Studio EX 5.0.5 With Keygen/key Free Download
Smith Micro Manga Studio EX 5.0.5 With Keygen/key Free Download was composed with craftsmen's work process at the extremely top of the need rundown. The greater part of the most utilized apparatuses - pens, pencils, erasers, rulers, design brushes and choice instruments are OK readily available. Tweak your own particular brush shapes, canvas surfaces, paint declarations and more and after that spare those as your individual settings. 

Smith Micro Manga Studio EX 5.0.5 Free Download has dependably had a solid set of pens and brushes, yet the bar has been raised with form 5. Pick a painting style from one of the numerous preset paint statements like watercolor, oil painting, or liveliness style painting.

Smith Micro Manga Studio Free Download are a discriminating piece of comic creation and Manga Studio 5 has a gigantic library of screen tones or designed tones to browse and an effective set of tone apparatuses. Change painting territories to toned regions just by turning on the tone mode. Alter toned regions effortlessly, bend toned zones along states of drawn subjects.

DOWNLOAD NOW (MIRROR LINK)


Smith Micro Manga Studio EX 5.0.5 With Keygen/key Free Download

Pinnacle Studio Ultimate With Serial Key Free Download


Pinnacle Studio Ultimate With Serial Key Free Download

Pinnacle Studio Ultimate With Serial Key Free Download conveys the force and velocity to make proficient looking HD and 3d features and interactive media. You get all the peculiarities and trusted innovation from Apex Studio In addition to and then some Live Catch, 4k Ultra HD help, izotope Music & Discourse Cleaner exactness altering, upgraded media labeling, extra Scorefitter soundtracks, and Blu-ray™ composing. Alter anyplace on a boundless number of tracks with coordinated cloud get to and Apex Studio for ipad1 task importing. Fortify your features with 2000+ 2d/3d moves, impacts and layouts in addition to the magnificent Red Goliath Movie producer's Tool compartment and Movement Illustrations Toolbox. 

Key Gimmicks 
-See comes about sooner with up to 10x quicker feature rendering2 
-Make custom soundtracks for your motion picture with the new Smartsound Sonicfire Module for Studio 
-Alter on boundless tracks with edge precision in HD and/or progressed stereoscopic 3d 
-Make eye-popping impacts with Red Monster Producer's Toolbox and Movement Representation Tool compartment 
-Record straightforwardly from your screen with Live Screen Catch 
-Upgrade sound quality with izotope Music & Discourse Cleaner 
-Produce amazing feature with backing for 4k Ultra HD 
-Include fervor with in excess of 2000 2d/3d extra impacts 
-Make Dolby® 5.1 encompass Blu-ray™/DVD plates and fare to your most loved advanced gadgets and organizations 
-Compose, label, and rate your most loved cuts and music with the implicit media library 
-Improve and right films, photographs and sound right inside the media library 
-Sneak peak course of events and source cuts at the same

DOWNLOAD NOW (MIRROR LINK)


Pinnacle Studio Ultimate With Serial Key Free Download

Connectify Hotspot PRO 7 With Crack Free Download


Connectify Hotspot PRO 7 With Crack Free Download

Connectify Hotspot PRO 7 With Crack Free Download
Connectify Hotspot PRO 7 is computer code that is accessible to transfer absolutely activated and registered version without charge transfer.It is a straightforward code that is employed to router for your Windows system and portable computer that permits your system to remodel  into a LAN hotspot.By mistreatment Connectify Hotspot professional seven Free transfer you\'ll share one net reference to your friends, co-workers and on all of your mobile devices.you can flip your Windows pc into a true LAN hotspot that is additionally accustomed share 3G and 4G reference to the other Wi-Fi enabled devices.


How To use
1.First of all Install Setup
2.when end install  then shut it  and  if provoke revive cancel it then do not run it.
3.then Run \"ConnectifyExit.bat
4.Copy files from cracked folder into \"C:\\Program Files\\Connectify\" or \"C:\\Program Files (x86)\\Connectify\"
5.Restart your pc.
6.Cancel Updates.
7.Enjoy

DOWNLOAD NOW (MIRROR LINK)


Connectify Hotspot PRO 7 With Crack Free Download

Norton Internet Security 2013 With Serial And Crack


Norton Internet Security 2013 With Serial And Crack

Norton web Security 2013 robust on protection, lightweight on system resources, award winning! It runs quietly within the background to observe and block todays advanced threats and to shield your identity once you purchase, bank, or browse on-line. The friendly and economical product style helps minimize confusing security alerts and system slowdowns which will get within the approach of your on-line expertise. Norton web Security provides essential protection from viruses, hackers, spyware, spam and alternative privacy threats. A comprehensive set of security tools, NIS helps keep you safe on-line as you surf and email, swap files, transfer programs, and chat. NIS additionally permits you to mechanically block annoying banner ads and pop-up windows, came upon parental website block choices for limiting access to specific internet sites, and by selection confirm that, if any, Java applets and ActiveX controls ought to be allowed to transfer and execute on your pc. relish the net with victory protection!
Key Technologies:
Key options Of Norton web Security 2013:
Online identity protection
Antivirus
Antispyware
Antispam
Phishing protection
Smart firewall
Social network protection
Browser protection
Rootkit protection
Network mapping and observance
Worm protection
Parental controls management

Part 1

Part 2


DOWNLOAD NOW (MIRROR LINK)


Norton Internet Security 2013 With Serial And Crack

Belajar HTML Dasar Part 11: Cara Menambahkan Gambar di HTML (tag image)


Sulit membayangkan sebuah halaman HTML tanpa gambar untuk standard web saat ini. Pada tutorial belajar HTML cara menambahkan gambar di HTML ini kita akan mempelajari cara penggunaan tag image. Tag Image digunakan untuk menampilkan gambar kedalam halaman web, menggunakan <img>.

Atribut src dalam tag <img>

Atribut src adalah singkatan dari source, merupakan atribut yang berisi alamat dari gambar yang akan ditampilkan. Alamat ini bisa relatif atau absolute. (perbedaan tentang alamat relatif dan alamat absolute telah kita bahas pada Belajar HTML: Cara Membuat link di HTML).
Untuk contoh kode HTML tentang image ini, sediakan sebuah gambar yang akan digunakan sebagai tampilan, dan tempatkan gambar tersebut ke dalam satu folder dengan halaman contoh. Gambar dapat berupa JPEG, PNG, maupun GIF.
Pada contoh dibawah ini saya menggunakan sebuah gambar koala.jpg yang berada dalam satu folder dengan halaman HTML saat ini. Savelah sebagai img.html
Contoh penggunaan tag <img>:
1
2
3
4
5
6
7
8
9
10
<!DOCTYPE html>
<html>
<head>
   <title>Penggunaan Tag Image</title>
</head>
<body>
   <h1>Belajar Tag Gambar</h1>
   <img src="koala.jpg" />
</body>
</html>
Perhatikan bahwa tag <img> tidak memiliki elemen, sehingga langsung ditutup dengan />
Cara Menambahkan Gambar di HTML

Hati-hati dengan penulisan atribut src, sering gambar gagal tampil karena kita salah ketik atribut src menjadi “scr”.

Atribut alt dalam tag <img>

Tag image juga memiliki atribut penting lainnya, yaitu alt
Atribut alt adalah singkatan dari alternative description, dimana alt digunakan untuk keterangan dari gambar jika gambar tersebut gagal ditampilkan oleh browser. Atau jika web broser telah disetting untuk tidak menampilkan gambar.
Contoh penggunaan atribut alt pada tag <img>: 
1
2
3
4
5
6
7
8
9
10
<!DOCTYPE html>
<html>
<head>
   <title>Penggunaan Tag Image</title>
</head>
<body>
   <h1>Belajar Tag Gambar</h1>
   <img alt="gambar koala" src="koala.jpg"/>
</body>
</html>
Atribut alt juga berperan penting untuk mesin pencari seperti Google. Karena cara kerja google yang meng-index seluruh situs dengan memproses tulisan yang ada, Google ‘tidak mengerti’ isi dari gambar tanpa bantuan deskripsi yang ditulis dalam atribut alt. Hal ini menambah pentingnya menambahkan atribut alt.

Atribut width dan height dalam tag <img>

Atribut lainnya membolehkan kita untuk menentukan besar dari gambar yang ditampilkan, yaitu width dan height.
Contoh penggunaan atribut width dan height pada tag <img>:
1
2
3
4
5
6
7
8
9
10
<!DOCTYPE html>
<html>
<head>
   <title>Penggunaan Tag Image</title>
</head>
<body>
   <h1>Belajar Tag Gambar</h1>
   <img alt="Gambar Koala" src="koala.jpg" height="200" width="100" />
</body>
</html>
Cara Menambahkan Gambar di HTML Width
Pada penggunaan tag image diatas, gambar terlihat tidak proporsional, hal ini karena penggunaan atribut width dan heightmemaksa‘ gambar untuk tampil dengan nilai yang kita tetapkan.
Untuk mempertahankan proporsi gambar, namun tetap membuat gambar menjadi besar/kecil, cantumkan hanya salah satu atribut saja (width saja atau height saja, namun tidak keduanya). Misalkan jika kita menetapkan atribut width=300px (tanpa mencantumkan height), maka web browser akan menampilkan gambar dengan lebar 300px, dan menghitung secara otomatis tinggi gambar agar gambar tetap proporsional.
Biasanya web server akan menampilkan text terlebih dahulu, baru mengirim gambar setelahnya. Untuk web server yang sibuk, atau gambar dengan ukuran besar, hal ini akan menyebabkan text berpindah tempat karena gambar yang terlambat ditampilkan. Mencantumkan ukuran dari gambar dengan atribut width dan height akan memberikan kesempatan kepada browser untuk mempersiapkan ukuran tersebut untuk gambar, dan text tidak akan berpindah.
Update: Untuk mengatur posisi gambar dan membuat garis tepi (border), silahkan lanjut ke Tutorial HTML Lanjutan: Cara mengatur tampilan gambar dalam HTML (atribut align dan border)

Untuk menampilkan data, baik itu berasal dari database atau dari sumber lain, akan lebih rapi jika menggunakan tabel. Dalam tutorial belajar HTML dasar selanjutnya, kita akan membahas tentang Cara Membuat tabel di HTML menggunakan tag <table>.

36 responses on “Belajar HTML Dasar Part 11: Cara Menambahkan Gambar di HTML (tag image)

  1. putri fakhrun nisa says:
    Terimakasih yaaa, ini membantu banget, :)
  2. Dian says:
    mau tanya dong, saya pasti kalau memasukkan gambar format .jpeg pasti error atau gak mau keluar gambarnya kenapa ya?
    • Andre says:
      Seharusnya tidak ada masalah, coba bisa dipastikan lagi apakah gambarnya berekstensi .jpeg atau hanya .jpg, dan juga dipastikan agar kode HTMLnya bersesuaian, contoh: src=”koala.jpg” atau src=”koala.jpeg”. Mudah-mudahan bisa membantu ya, Dian..
      • mq says:
        iya,,saya juga sama,,pas saya memasukkan gambar,gambarnya ga keluar…mohon pencerahannya,,terimakasih atas ilmu yang sudah diberikan,dan sangat bermanfaat untuk saya…
  3. Fikar says:
    Info yg bagus gan
    Saya lagi belajar tentang edit html
    Lumayan buat nambah wawasan aja
    Di tunggu kunbalnya
  4. Nalendra says:
    kalo beda folder gimana gan?
    • Andre says:
      Jika gambarnya terletak di dalam folder, maka penulisan lokasi gambar menjadi: src=”nama_folder/koala.jpg”, namun jika foldernya berada di folder diatas halaman HTML tempat kode dijalankan, maka alamatnya menjadi src=”../koala.jpg”.
      Sebagai pemahaman dasar, Nelandra bisa membacanya di tutorial Belajar HTML Dasar: Cara Membuat link di HTML (tag a)
      Semoga bisa membantu… ^_^
  5. Jocelyne says:
    kak, gambarnya kalau di browsernya engga mau muncul gimana kak ?
    • Andre says:
      Biasanya sering kesalahan tag terletak di atribut src=”koala.jpg”, pastikan bahwa nama gambarnya tidak salah ketik, dan juga tidak salah dalam singkatan src=”koala.jpg”, bukan scr=”koala.jpg”.
      Semoga bisa membantu Joscelyne.. ^_^
  6. rizal says:
    tq info y
  7. bang, bagus kali artikelnya
    saya baru baca sampai sini
    ngga pa pa kan bang klw sering di baca ?? =)
    • Andre says:
      Hehe, tentunya saya malah senang artikelnya bermanfaat dan sering dibaca :)
      silahkan di bookmark agar duniailkom mudah diakses.
      Sukses buat belajarnya, andhika,. :)
  8. robby says:
    mau tanya gan, kalo taq buat ngubah posisi gambar di kanan ato dikiri bisa ga,..?
  9. dewi says:
    kalau cara memasukkan gambar supaya bisa di zoom bagaimana ya caranya ?
  10. andi says:
    pada tutorial img ini,saya tidak bisa menampilkan gambar di laman browser,mhn petunjuk,kira kira kesalahan dimana.tq
    • Andre says:
      Biasanya gambar tidak tampil karena kesalahan lokasi gambar (untuk tutorial ini, file gambar harus berada di dalam 1 folder dengan file html-nya), atau kesalahan ketik seperti : src=”koala.jpg” yang ditulis menjadi src=”koala.jpeg”.
      Mudah2an bisa membantu…
  11. Apip says:
    Ternyata Mudah bangget
  12. Fajri Alhado says:
    Mau tanya nih
    Saya kan mau menyisipkan gambar pakai html
    Posisi nya gambar dari komputer
    Nah jadi saya mau buat banyak gambar
    Jadi misal gambar 1 saya klik, otomatis berlanjut ke gambar 2 dan begitu seterusnya.
    Nah cara membuat banyak gambar gimana?
    • Andre says:
      Mungkin maksudnya membuat slideshow ya? jadi kalau gambar saat ini di klik, akan muncul gambar berikutnya.
      Untuk membuat efek slideshow ini biasanya menggunakan HTML + JavaScript, untuk kodenya fajri bisa search di google dengan kata kunci “JavaScript Sildeshow” atau “jQuery Slideshow”, salah satunya bisa dilihat seperti ini: http://zurb.com/playground/orbit-jquery-image-slider.
      Namun karena mempelajari JavaScript + jQuery sedikit “lebih rumit” dari pada HTML, untuk mendapatkan efek “misal gambar 1 saya klik, otomatis berlanjut ke gambar 2 dan begitu seterusnya“, maka kita bisa mengakali dengan membuat banyak halaman HTML, dimana 1 gambar di dalam 1 halaman HTML, contohnya: gambar1.html berisi gambar1.jpg, gambar2.html berisi gambar2.jpg, dst. Kemudian kita membuat link dari gambar 1 ke halaman gambar 2, seperti berikut ini:
      <a href=”gambar2.html”><img alt=”gambar1″ src=”gambar1.jpg”/></a>
      Namun jika fajari memiliki waktu luang, silahkan pelajari JavaScript+Jquery, duniailkom telah membuat tutorial dasar JavaScript pada Tutorial dasar JavaScript untuk pemula.
      Sumber

- Copyright © Software tutorial Serba Ada - Skyblue - Powered by Blogger - Designed by Johanes Djogan -